
How To Use Akai MPK Mini: Essential Tips for Creating Music Anytime and Anywhere
We may earn a commission for purchases using our links. As an Amazon Associate, we earn from qualifying purchases.
If you are a musician or producer, the worst thing that could happen to you is for inspiration to strike at a time or place where there are no tools to lay it down.
You know what comes next—you lose the melody, which means you would miss out on creating your next great piece.
Fortunately, there is a simple but elegant solution: the Akai MPK Mini!
Getting one is your first step towards merging music and mobility.
The second more important step is to figure out how to use Akai MPK Mini.
What Is the Akai MPK Mini?
Before we answer how to use Akai MPK Mini, it is important to familiarize yourself with this amazing equipment.
There are several models available:
The Akai MPK Mini is a high-quality keyboard controller designed with the traveling musician and budding desktop producer in mind.
It is super compact, weighing around 1.65 pounds, and housed in a 12” x 7” x 2” sturdy plastic body.
Still, it comes packed full of features needed to make music.
It lets you do everything quickly, from recording to composing to playing several virtual instruments.
The best thing is that it allows you to do these things practically anywhere and anytime.
You can stick it in your backpack and take it where you need to go.
From there, you can just put it on a small studio desk and get to work.
Get Creative Wherever and Whenever
The Akai MPK Mini is designed for maximum portability without limiting creativity.
It comes with VIP software which lets you navigate its hardware and software seamlessly.
You can use it with virtual instruments, play around with effects plugins, or link it to a digital audio workstation (DAW).
This Mini MIDI keyboard does not need any software drivers to function or an external adapter for it to operate.
It supports the USB-MIDI interface and can be powered up whether you are using Windows or macOS.
That means you can synthesize beats, sounds, or anything that comes to mind, wherever and whenever.
How To Use Akai MPK Mini: The Essentials
The Akai MPK Mini opens up endless possibilities for making music. The key is to be aware of all its cool features so you can make the most of it.
You do not need a lot of experience to enjoy the Akai MPK, but you need some practice.
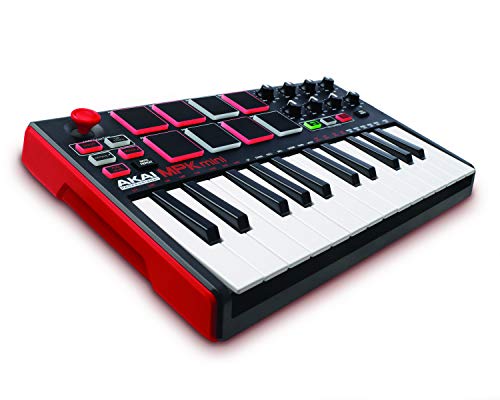
The Lay of the Land
Aside from being extremely handy, the Akai MPK Mini is also very versatile.
It is built with an assortment of hardware controls.
A red joystick on the upper left corner allows you to control the pitch with side-to-side movements while toggling it up and down controls the modulations.
There are six buttons right below it; these are the arpeggiator controls.
Using these buttons, you can control the octave shift of the keyboard, the tap tempo, and some functions of the drum pads.
To the right are eight pressure-sensitive drum pads, which are built with red LED backlights.
Right next to them are eight assignable control knobs that let you control some features of the drum pads and other functions of the equipment.
Below these control knobs are three buttons: the program change, CC, and the A/B banks.
At the lower half of the equipment is the 25-piece keyboard that also lets you get different levels of swing, arpeggiation patterns, randomizing, and other controls using a shift key.
At the right side of the board is the USB port and at the rear is the input jack for a full-size sustain pedal.
Getting Started
Now that you have brought an Akai MPK Mini home, the first thing that you should do is plug it in and register it online.
You would need to create an Akai pro account for this.
Once done, you can get the authorization codes for all the software and content that come with the product.
That includes the MPC Essentials, the AIR Hybrid, and three content packs that let you produce beats and make music in no time.
If you are going to use the MPC Essentials and want to trigger sample sounds, you should use the pads.
However, you will need to install a preset first so that they will give the right notes.
To do this, you just have to press the Pad 6 button while holding the Prog Select.
Make sure that the pad flashes, which indicates that you successfully installed the preset.
If this doesn’t work, don’t worry. You can download the MPC mapping file instead and load it into your MPK mini.
When in stand-alone mode, the MPC Essentials lets you use only one sound at a time.
To access the other instances as a plugin, you could use the software with another DAW.
If you feel that the MPC Essentials is not for you, you could just use another DAW altogether.
There are many options available from various developers, and you can use virtually any of them with the Akai MPK Mini.
The even better news? Many of these music software solutions come at a low price point or are free.
Once your MPK Mini and MPK Essentials are set up, all you need is a little practice.
Before you know it, you are laying down beats and creating music like a pro.
Taking It To the Next Level with the MPK Mini MIDI Editor
If you want to get the most out of using your MPK Mini, you need to master the MPK Mini Editor.
It is a preset management software that lets you map your pads to any function that you wish.
You can also use it to create and modify presets, matching them with your preferred plugins, virtual instruments, and DAWs.
In short, it allows you to unlock the full potential of the Akai MPK mini.
Using the Akai MPK Mini: A Recap
The Akai MPK Mini is ideal for musicians and new studio producers who are always on the go.
It is compact but has all the features needed to make music.
The MPK Mini has many hardware controls, software options, and plugins that give you the freedom to indulge your creativity.
The key is to know each button, key, or feature intimately.
With patience and enough practice, you can create beautiful music whenever and wherever with the Akai MPK Mini.